Thursday, February 28, 2019

Seal caulk tubes with PEX cutoff caps

We have all been there.  I've tried many things over the years to prevent caulk from drying out in the tip of the caulk tube, from nails and screws to wire nuts, from various types of tape to the caps that come with some adhesives.  Some work OK, and some don't.  Inevitably it usually dries out in the tip, making it a pain to dig out the dried caulk so it will flow.


I recently re-plumbed the laundry room in a house we're renovating with 1/2" PEX, and I had a few scrap cutoffs that were anywhere from 3" to 6" in length.  They've been sitting in a bucket for a couple of weeks now because, to my knowledge, they are not recyclable in my area.  In the back of my mind I was trying to think of a way to reuse them before just dumping more plastic in the landfill. 

A few days ago I had finished doing some caulking, and I went for the pile of miscellaneous screws to find a 2-1/2 or 3" drywall screw to plug the tube - something that most of us have been doing for years without even a thought - when I caught a glimpse of the PEX bucket out of the corner of my eyes and (sound of brakes screeching) those would fit right over the nozzle!!!

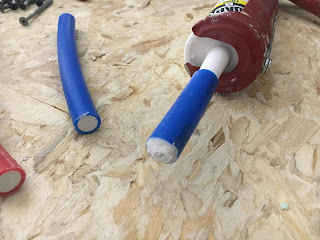
I took one of the cutoffs and put it over the nozzle, and it had a nice tight compression fit that seemed like it would be air tight.  I stuffed a small piece of rigid foam (scrap from anther project) into one end, leaving about a 3/8" gap so I could squeeze a little of the caulk into the end to seal the pipe.


After checking the fit, I made a few more of them (the first one wasn't quite as neat as the next few).  I put my new "cap" onto the caulk nozzle, pushed it on tight, and left it overnight.

When I checked it the next morning, the caulk on the end still wasn't completely set up all the way through.  I took it off the caulk tube carefully to see if it sealed well, and the caulk came out of the nozzle just as well as when I put it away!


I left it alone over the weekend, and when I checked it again the caulk was still fluid at the tip! So far I think it works really well.  If it does indeed work for long periods of time, no more digging dried caulk out of the tip!

Follow up:

After over a week the caulk is still fluid at the tip and required no poking or cleaning to use!  I'll leave the last bit in the tube and leave it for an extended period to see how well it does, but if you're going to use the tube within a week or two, it seems to work.

Notes:

The caulk I did this experiment with was an Acrylic/Latex "painter's" caulk (DAP Alex 25 yr with the green writing).  It does not adhere well to the inside of the PEX tube, and if you push it with your finger it will move.  It still seals the tube, but I'm going to make some with a silicone caulk or adhesive next time I'm working with it.  Maybe that will stick better to the PEX.  

What you'll need:

  1. A piece of 1/2" PEX tubing 3"-6" long.
  2. Caulk/sealant - Silicone or Acrylic/Latex plus Silicone will probably work the best.
  3. Small piece of foam or something to stuff in one end to form a backer for the sealant.
Instructions:
  1. Stuff your backer material in one end of the PEX tube, leaving 3/8"-1/2" at the end for the tube for the sealant.
  2. Apply sealant to the end of the tube and let dry for 24-48 hours.
  3. Press the open end of the PEX tub over the tip of the open caulk tube, making sure the fit is snug.

Wednesday, November 28, 2018

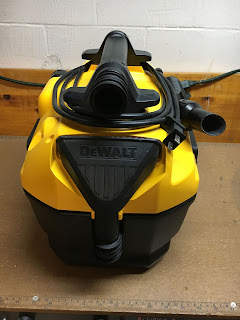
Dewalt DCV581H Cordless/Corded Wet/Dry Vacuum Review


Because battery packs are the biggest cost of cordless tools, most of the best deals involve large combo kits, or tools with free or very cheap additional batteries.  I’ve wanted the Dewalt cordless/corded vac for a while now, and when the large orange store had a special buy for $87, I jumped on it. I ended up finding a deal to buy the vacuum with a 5Ah XR battery pack, charger, and tool bag, which brought the battery kit down to half price.  I decided to go with that deal so I could have a high capacity battery that would run the vac longer and a charger so if I didn’t have my other tools I would be able to charge the battery.


Below is my initial review after using the vacuum up around my basement shop, and vacuum out the cat fur from the coils on my refrigerator (yes this needs to be done periodically, they are very furry!):


My first thoughts after unboxing the vacuum were how well thought out the design is. I like the way all of the tools attach the body so you don’t have to carry a bag of vacuum tools around or lose any parts. The floor attachment clips into a recessed spot on the front, the crevice tool slides into the top handle, the hose wraps around the back and clips onto the side, and the cord wraps around the handle.

I also like the fact that a Gore HEPA filter is included instead of a cheap paper filter.  It does not come with an extension wand, probably because it’s designed as a lightweight hand held vacuum, but more on that later.

Some of the reviews I read about this vacuum stated it lacks suction power, but I disagree. After using the vacuum a couple of times, I found it had more than adequate suction for a small, lightweight vacuum, even running on battery power.  Does is have as much power as my full size contractor vac?  No, but it is unrealistic to expect it to.  It did a good job cleaning up sawdust and other small debris in my workshop, and easily took care of the cat fur on the refrigerator coils. I even switched over to the blower port to blow off the inner coils that could not be reached.  So far, it seems like the perfect vacuum to clean up after small jobs where a larger vacuum would be inconvenient to bring along.

Pros:
  • Small and light!
  • Tools "nest" nicely on the tool.
  • Cordless and corded - very versatile.
  • Gore HEPA filter is easy to clean.
Cons:
  • No extension wand or brush attachments.
  • Lip on the inside of the "bucket" makes it a little difficult to empty all of the dust.
Notes: 
  • Tested with a 20v Max 5Ah XR battery.  This is one of the larger capacity batteries in their line, so I may get better results than if I used a 1.3Ah battery that comes with most combo kits.
  • I plan on updating my review after using this for a while and with different battery packs.
Overall: Very pleased with the vacuum, if I were to rate it I would give 4.5/5 stars!  


In my next post I'll show you a quick modification I did to carry extra tool(s).


Sunday, April 23, 2017

Black & Decker Workmate 425 DIY lower shelf

I've been meaning to make a lower shelf for my Workmate 425 for a while, but for one reason or another never got around to it. Last week I had enough leftover 1x6 tongue and groove pine boards to make it.  One of the challenges of making the lower shelf for these workbenches is actually putting it in place (the space is very tight), which is why using a solid piece of sheet material doesn't work well, and using regular 1x6 boards creates spaces in the shelf for small items to fall through.

After a couple adjustments to the length of the pieces I ended up with a nice shelf that went in fairly easily and stays in place even when the bench is folded up for transport. I found the tongue and groove works well because not only does it make a solid platform, but the grooves keep things from rolling off.


Seal caulk tubes with PEX cutoff caps

We have all been there.  I've tried many things over the years to prevent caulk from drying out in the tip of the caulk tube, from nail...